
Codex · Part 5
Integrating Domestic Models Like DeepSeek
3 min read
📚 Series Navigation: The previous chapter 04 · Subscription and Billing made Codex's billing clear—whether a subscription or pay-as-you-go is more cost-effective. This article continues along the path of 'saving money' to talk about a wilder approach: replacing the brain behind Codex with a domestic model like DeepSeek. ⚠️ Let's make things clear first (experimental, subject to change, subject to actual testing): Codex is OpenAI's own product, and its official documentation has no intention of letting you connect DeepSeek. Connecting Codex to third-party models is a path created by the community, relying on a loophole left by the official team—custom model providers (
model_providers). Whether this path works and how smoothly it runs depends on which interface protocol the third-party model supports, and this is exactly where things are most likely to fail (detailed in Section 03 later). In this article, whenever something is explicitly written in the official documentation (configuration items, default behaviors), I have marked its source. The DeepSeek part is mainly based on actual tests and community solutions. API base URLs, model names, and protocol support can change at any time; everything is subject to DeepSeek and Codex official sources.
Guys, let's first recreate a real conversation I had recently:
Colleague: "Didn't you connect Claude Code to DeepSeek and save a lot? Just copy it for Codex." Me: "I thought so too... but after playing with it for two hours, even though the configuration was completely correct, sending a request resulted directly in a 400." Colleague: "Ah? Isn't it just a matter of changing the
base_url?" Me: "Codex and Claude Code don't follow the same playbook. They look similar, but they are very different deep down."
Honestly, this is the article in my entire Codex series where I want to give you a heads-up the most. Search for "Codex DeepSeek" online, and you will find plenty of tutorials, but 90% of them fail to explain one crucial thing: connecting Codex to a third party and connecting Claude Code to a third party have completely different underlying logic. If you copy the experience from Claude Code, you will likely get stuck on the protocol. This article will dig up this pit from its roots for you.
After reading this article, you will get:
- A single sentence explaining the fundamental difference between connecting Codex and Claude Code to a third party (saving you hours).
- A trade-off comparison table of "Should I connect Codex to a third party" so you can think it through before taking action.
- A pros-and-cons comparison and target audience analysis of the two integration paths (manually editing
config.tomlvs using a third-party proxy tool). - A
model_providersconfiguration skeleton to copy + validation methods + troubleshooting common errors.
01 Understand First: Changing Models in Codex is Not the Same as Claude Code
Let's start with the conclusion, which is the most valuable sentence in the whole article: Claude Code changes models by changing environment variables, while Codex changes models by changing the "model provider" in the configuration file; more importantly, Codex has strict requirements for third-party interface protocols—not just any compatible interface can be connected.
Let's break it down step-by-step:
When you install Codex, it is essentially a client running in the terminal—it reads code, calls tools, and manages context, but it doesn't think on its own. Every step requires sending a request to a large model. By default, this model is OpenAI's GPT (currently recommending gpt-5.5, source: Codex official "Models" documentation).
The so-called "connecting to a third party" means changing the target of this request from OpenAI to someone else. The official Codex documentation indeed leaves a loophole—the document states:
You can also point Codex to any model and provider that supports Chat Completions or the Responses API to suit your specific use case. (Codex official "Models" documentation)
Analogy: Plug Standards. Claude Code is like a universal adapter; as long as the third party provides an interface that is "compatible with the Anthropic protocol," it works instantly. Codex is different. It is like an appliance that only accepts specific plug standards—it only recognizes OpenAI's two "plugs" (Chat Completions and Responses API). Domestic models like DeepSeek generally provide an interface that is "compatible with OpenAI," which is an OpenAI-style plug, so theoretically it can plug in. But there is a hidden pit here.
The Codex official documentation explicitly states—Chat Completions API support is "deprecated and will be removed in a future version" (Source: "Models" documentation). That is to say, Codex is placing its bets on the Responses API. But the Responses API is OpenAI's own relatively new protocol, which many third-party model platforms have not fully implemented.
This was the root cause of why I got stuck for two hours at the beginning: I thought "DeepSeek compatibility with OpenAI" was all that was needed, only to run straight into the protocol wall.
💡 In a nutshell: Claude Code changes its brain by modifying environment variables and recognizes the Anthropic protocol; Codex changes its brain by modifying the model provider in
config.tomland recognizes the OpenAI protocol (and strongly pushes the Responses API)—don't force Claude Code's experience onto Codex.
02 Should You Connect Codex to a Third Party? Look at This Table First
Let me throw some cold water first: When it comes to "connecting to a third party," Codex is even less worth the hassle than Claude Code. This is my honest assessment after using both, not an attempt to sit on the fence.
The reason is simple and has three layers:
First, the success rate of Codex connecting to third parties is lower than that of Claude Code—it gets stuck on the protocol issues mentioned earlier, and it might not work on the first try.
Second, the coding capabilities of the GPT-5.5 generation of models in Codex are truly strong, especially for complex tasks and long-chain refactoring. Even if you connect a third-party model, it might not keep up, meaning you save money but compromise the quality of the work.
Third, the OpenAI subscription (Plus / Pro) itself already bundles Codex usage quotas (we did the math in the previous chapter 04). If you have already bought the subscription, spending money on APIs to connect to a third party is double paying.
Compare the official and third-party options side-by-side, and you'll get a clear picture:
| Dimension | Official GPT (Codex Default) | Third-Party / Domestic Models (e.g., DeepSeek) |
|---|---|---|
| Price | Expensive; heavy usage burns money | Extremely cheap; often cheaper by an order of magnitude |
| Direct Connection (Mainland China) | Most require proxy | Excellent; direct domestic connection for DeepSeek, zero entry barrier |
| Integration Difficulty | Log in and use | ⚠️ Protocols may be incompatible; might not connect |
| Code / Agent Capability | Extremely strong; GPT-5.5 first-tier, stable for long chains | Enough for daily use; complex tasks occasionally drop the ball |
| Official Support | Excellent; first-class citizen | Very weak; experimental, no one to back you up |
| Config Stability | Follows the official release | ⚠️ Requires reconfiguration if protocols or model names change |
See the difference? Unlike the conclusion in the Claude Code article where "third-party is the saving grace," here in Codex, third-party integration adds a layer of uncertainty about "whether it can even connect," tarnishing its value.
So, who is it still worth trying for? My recommendation:
- Yes (Give it a try): Heavy users whose API bills are painful and whose tasks are mainly daily CRUD operations; those who simply cannot connect to the official API and just want a domestic direct connection to get by; tech enthusiasts who love tweaking and want to use this as practice.
- No (Don't bother): Those who have already purchased OpenAI subscriptions (double paying is not cost-effective); those whose primary work involves complex architecture and difficult debugging (GPT-5.5's capabilities cannot be compromised); beginners who want things easy and hate messing with configurations (this path is truly not hassle-free).
My own conclusion is: For Claude Code, I often use DeepSeek to run rough tasks, but for Codex, I honestly stick to the official version. It's not that DeepSeek isn't good, but Codex's integration path is too unstable, making the cost-benefit ratio inferior to just focusing on using the official model well.
💡 In a nutshell: Connecting Codex to third parties carries an extra risk of "whether the protocol works" compared to Claude Code. Subscription holders who are double paying, those doing heavy tasks, and those who hate configuration tweaks should not join the hype; if you really want to try, be clear that this is an experimental approach.
03 Two Routes: Manually Modifying Config vs Proxy Tools
Assuming you still want to try after reading the above. Don't rush to copy the configuration—there are two integration routes, and picking the wrong one will result in wasted effort.
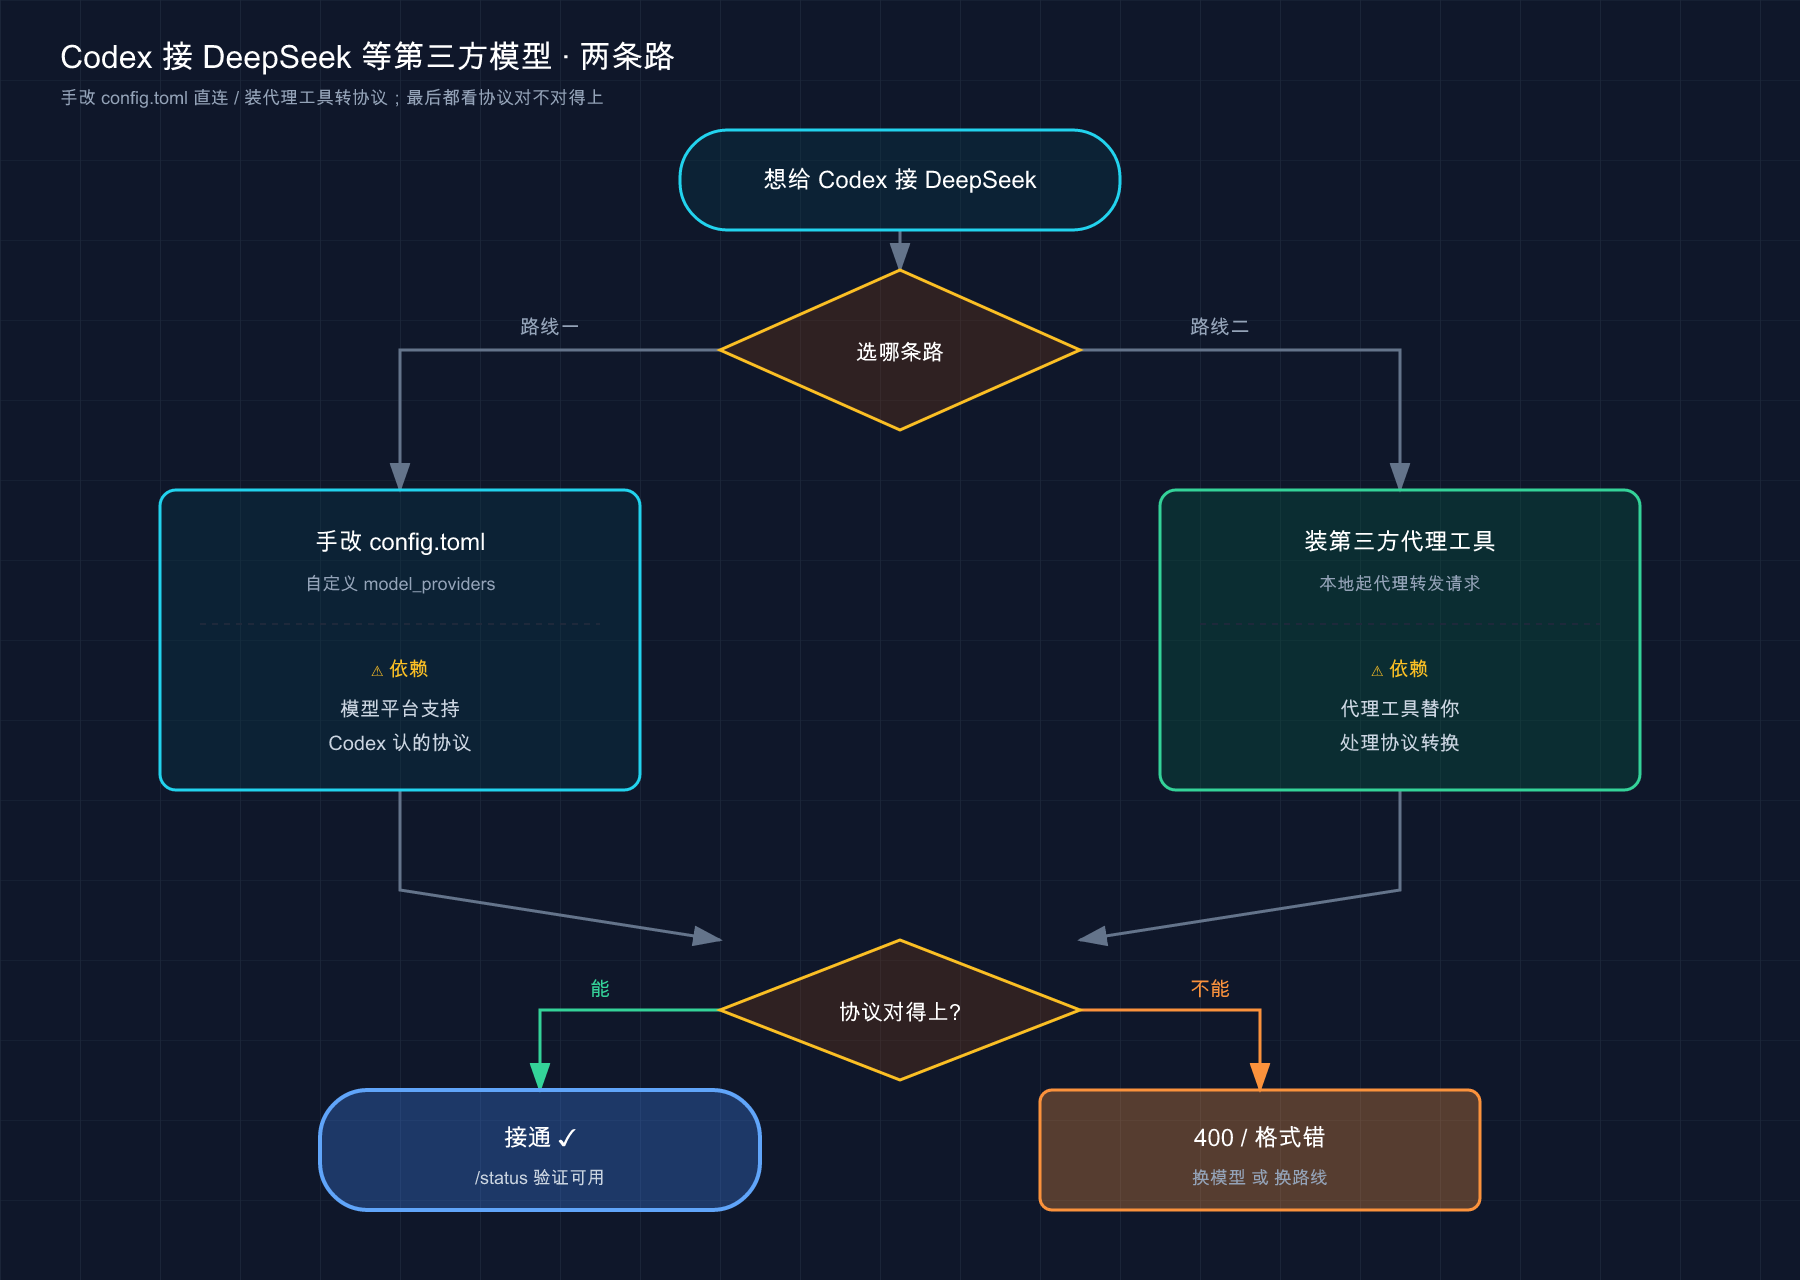
This diagram shows the complete decision-making landscape for integration: both routes lead to the same destination, but in the end, they both have to cross the "protocol" hurdle—this is the unavoidable threshold for Codex connecting to a third party.
Route 1: Manually Editing config.toml (The Official Loophole)
Codex keeps all configurations in one file: ~/.codex/config.toml (this is Codex's "user-level configuration file," source: official "Configuration Reference"). The official team supports you defining custom "model providers" in it.
Analogy: Creating a new contact in your address book. By default, the address book only contains OpenAI's number. If you want to call DeepSeek, you must first create a new contact entry in the address book: fill in the name, the phone number (base_url), and the password for verification (which environment variable to read the API Key from). Once created, you tell Codex to "dial this new contact this time."
There are only a few key configuration items (all from the official "Configuration Reference"; the first four are under the model_providers subtable, while the last two, model_provider / model, are top-level items):
| Configuration Item | Official Meaning |
|---|---|
model_providers.<id>.name | Display name of this custom provider |
model_providers.<id>.base_url | The API endpoint of the provider |
model_providers.<id>.env_key | Which environment variable to read the API Key from |
model_providers.<id>.wire_api | Which protocol to use. The official support only includes responses, and it is the default. |
model_provider (Top-level) | Which provider to use currently (default is openai) |
model (Top-level) | Which model to use currently |
Pay attention to the wire_api line—the official documentation states in black and white: responses is the only supported value. This is the biggest hurdle for Route 1: if the third-party platform you are connecting to only provides Chat Completions style interfaces and does not support the Responses API, then this official route might not work at all.
⚠️ DeepSeek officially provides an "OpenAI-compatible" interface, but it mainly corresponds to the Chat Completions style. Whether it can be accepted by Codex's
responsesprotocol depends heavily on the current implementations of both parties, and I cannot guarantee it for you—this step must be based on your own actual testing and the official documentation of both sides. If it works, count it as a win; if not, it is normal, and don't doubt your skills.
Route 2: Install a Third-Party Proxy Tool (Community Solution)
Since the protocol is the roadblock, the community came up with a workaround: run a proxy service on your local machine, responsible for "protocol translation"—Codex sends requests in the OpenAI format to this local proxy, the proxy converts them in the middle, forwards them to DeepSeek, and translates the response back when it returns. As far as Codex is concerned, it thinks it is talking to OpenAI the entire time.
CC Switch (a free, open-source cross-platform desktop tool, GitHub repository github.com/farion1231/cc-switch) takes this path: it starts a proxy locally, transparently forwards Codex's requests to your chosen backend, and includes presets for common platforms like DeepSeek so you don't have to fill them in manually.
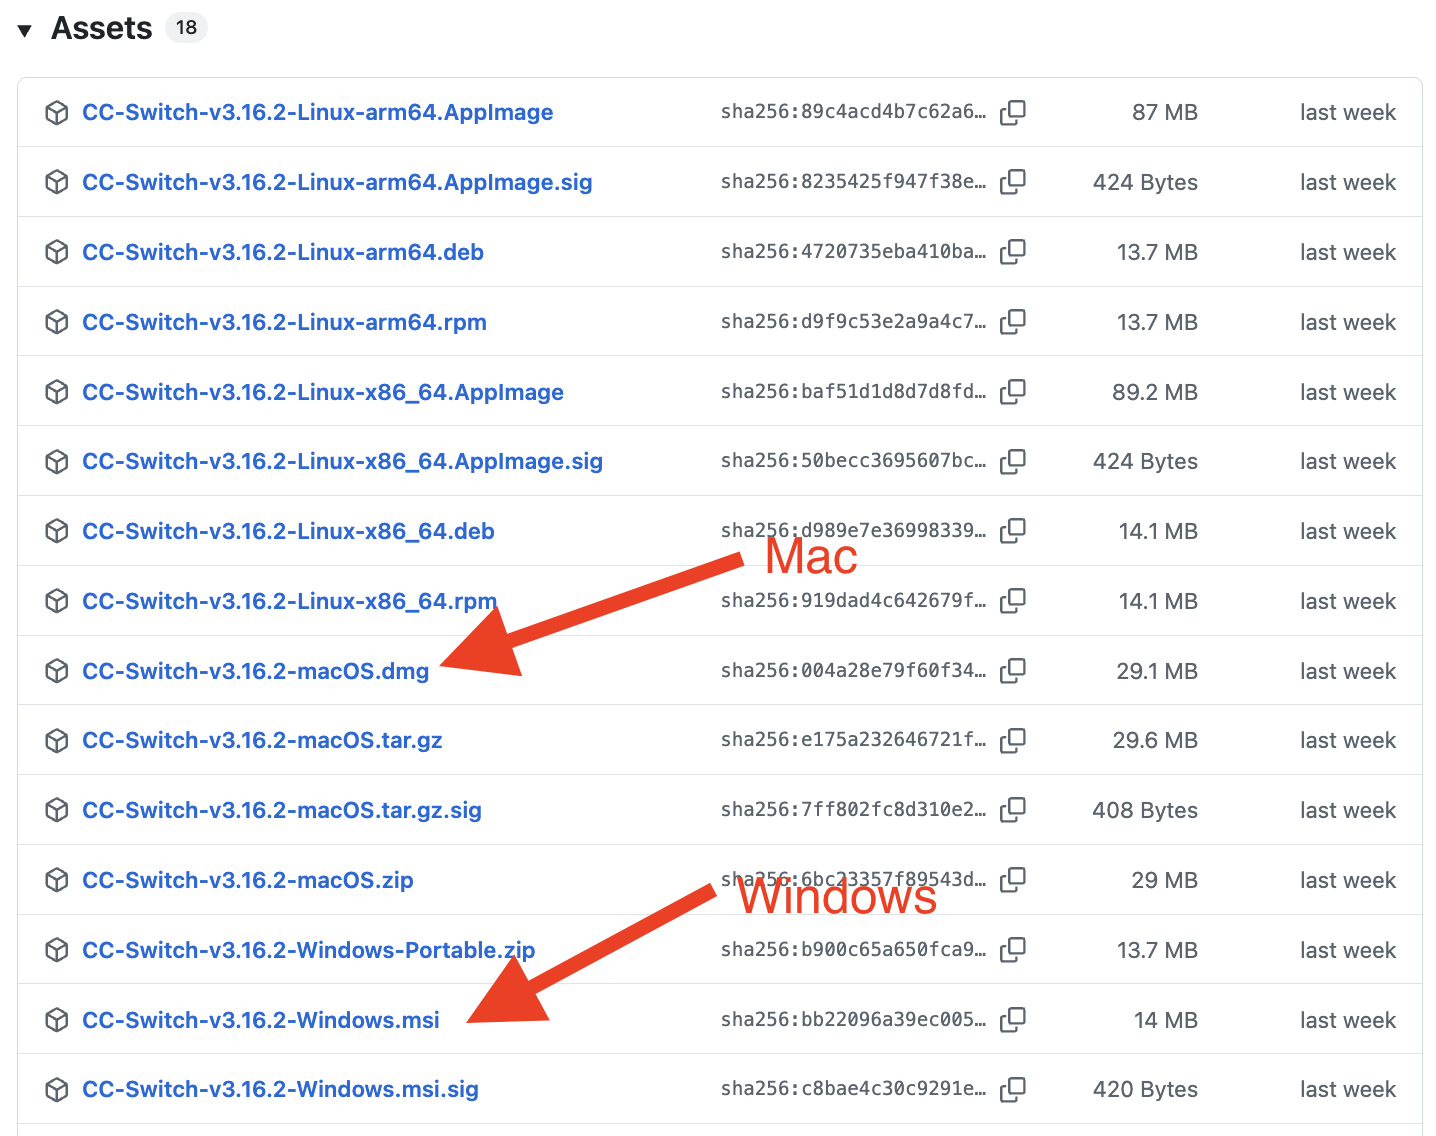
After installing CC Switch, open the main interface and click "Add Provider" or the corresponding "+" entry to enter the provider configuration page.

This image is the entry page for adding providers. Select the tool you want to configure (Codex in this case) from the list on the left, and the "Provider" settings area for that tool will expand on the right—here, select the backend you want to connect to (DeepSeek, etc.), fill in the corresponding API Key, and save. CC Switch will then transparently forward Codex's requests to the platform you selected.
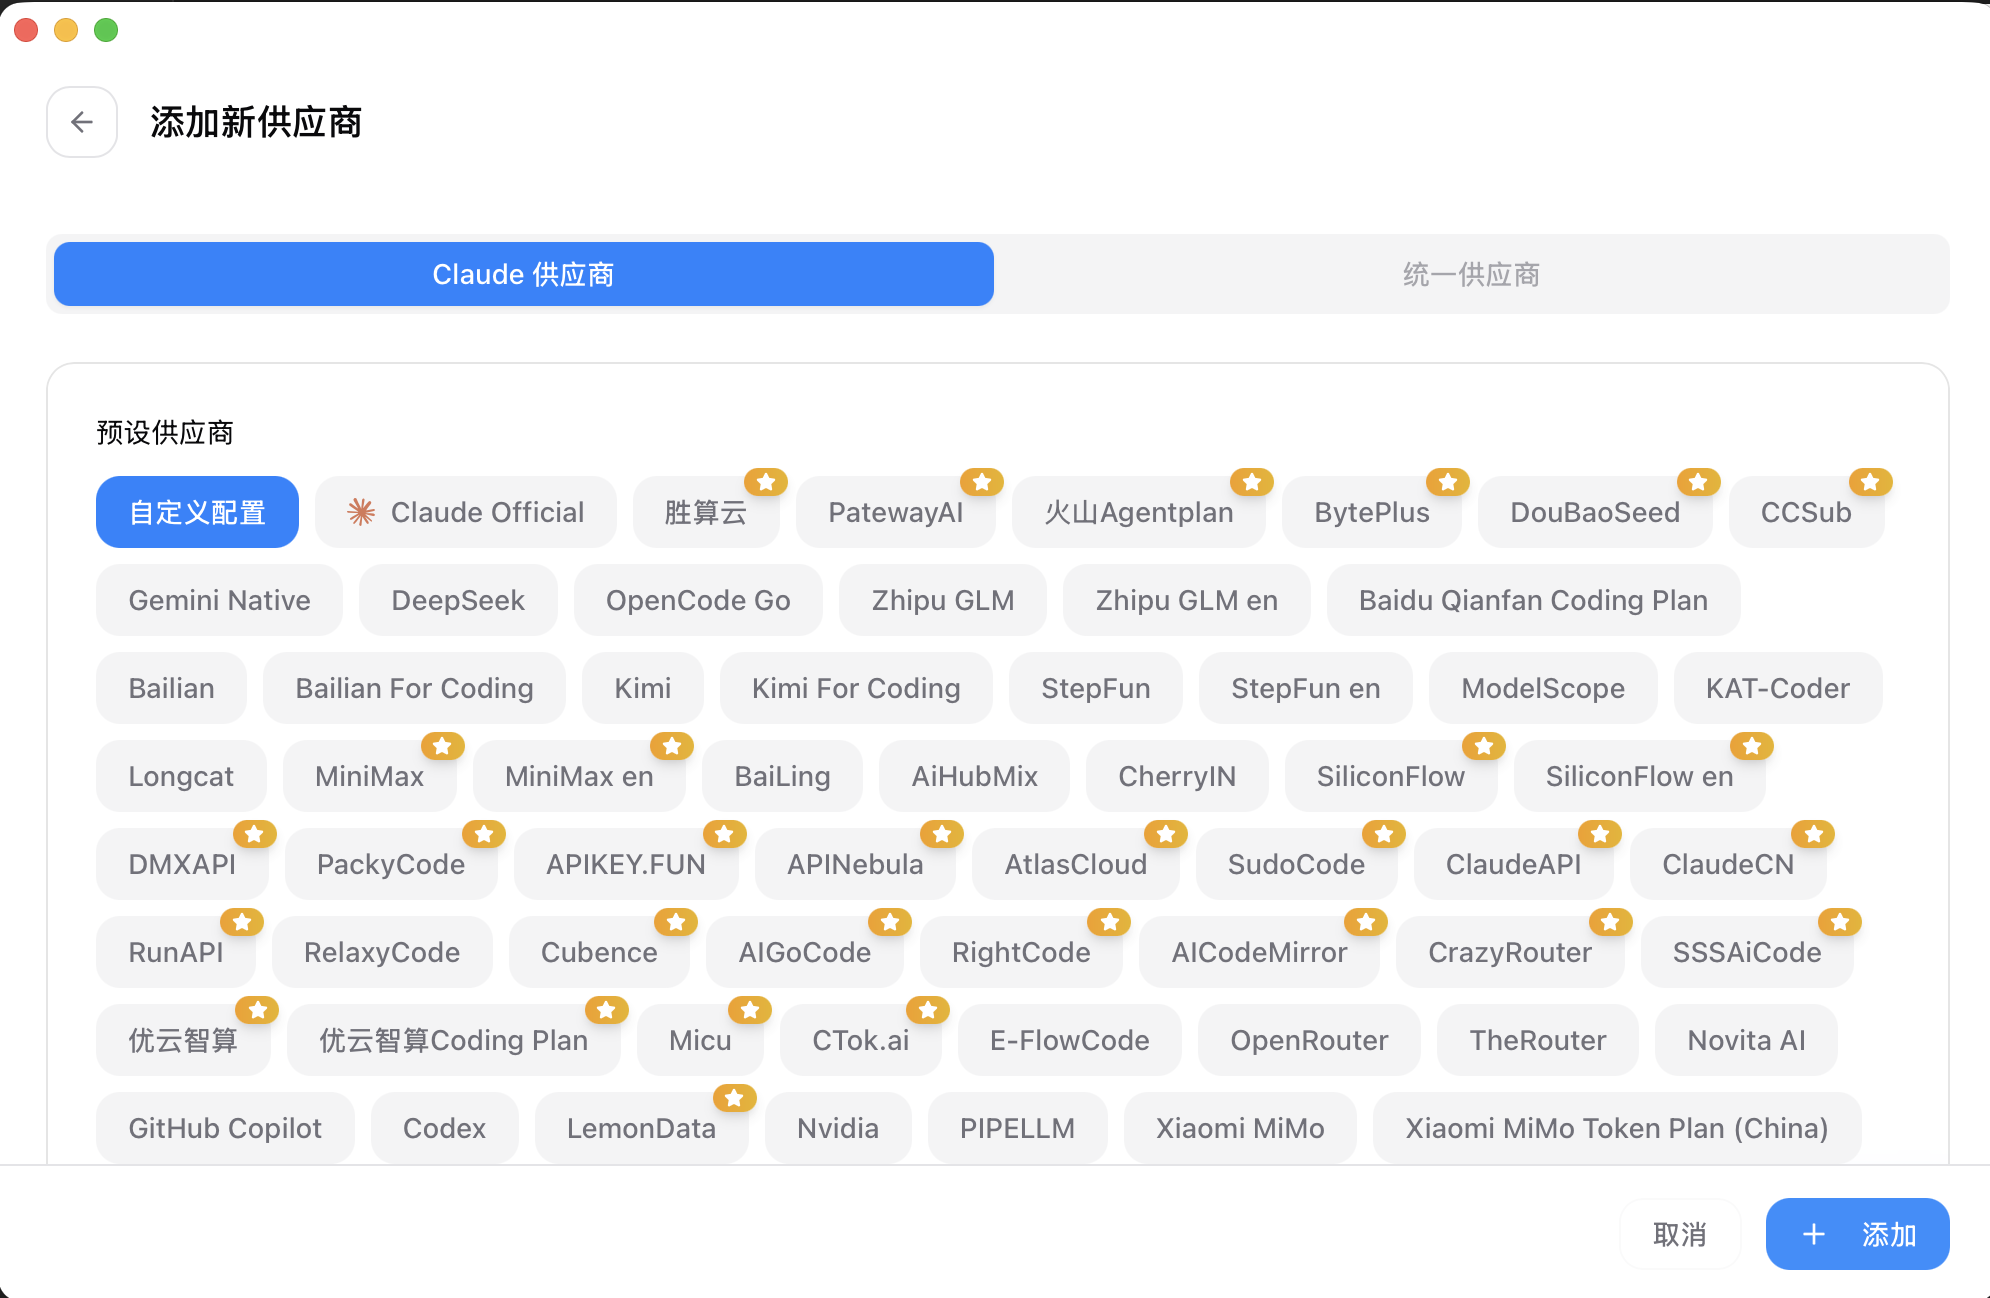
This image shows the preset list when choosing a backend—common platforms like DeepSeek and OpenRouter are built-in, so you don't need to manually fill in the address and protocol details; just select and enter the Key.
Analogy: Hiring an interpreter. You (Codex) only speak English (OpenAI protocol), and the other party (DeepSeek) only understands Chinese. Route 1 expects the other party to learn English themselves (the platform supporting the Responses API); Route 2 is hiring an interpreter (proxy tool) to stand in the middle and pass messages back and forth. If the interpreter is reliable, communication goes smoothly.
Compare the two routes to make your choice:
| Comparison | Route 1: Manually modifying config.toml | Route 2: Proxy tools (e.g., CC Switch) |
|---|---|---|
| Official? | Yes, uses the official configuration loophole | No, pure community third-party tool |
| Protocol Adaptation | ⚠️ Depends entirely on whether the platform supports responses | Yes, proxy does protocol translation, higher success rate |
| Ease of Use | Requires manually writing TOML, error-prone | Graphical interface, beginner-friendly |
| Transparency | Configurations are right under your eyes | Extra black-box layer, harder to troubleshoot |
| Multi-platform Switching | Reconfigure every time you change | One-click switching between different providers |
| Best for | Those who want to understand principles and love tweaking | Those who just want to run it quickly and hate writing configs |
My take: If you want to truly understand how Codex connects to third parties, take Route 1—even if it doesn't connect, you'll still understand the mechanics. If you just want to use it quickly and don't care about the principles, take Route 2—let the tools handle the protocol mess for you.
💡 In a nutshell: Route 1 is official configuration (transparent but relies on protocol luck); Route 2 is community proxy tools (extra black box but higher success rate)—choose proxy tools if you hate tweaking, and manual config if you want to understand the principles, though both routes ultimately depend on protocol compatibility.
04 Action: Minimal Skeleton for Manually Modifying config.toml
This section provides the configuration skeleton for Route 1. I write it as a "skeleton" rather than "copy-and-run" because of the protocol risks repeatedly stressed earlier—this set of configuration syntax is official and determined; but whether it works with DeepSeek requires your own testing.
Let's clarify platform differences first: the path for ~/.codex/config.toml is ~/.codex/ on Mac / Linux, and C:\Users\YourUsername\.codex\ on Windows (~ represents the user's home directory). If the file does not exist, create a new one.
Step 1: Obtain a DeepSeek API Key
- Open the DeepSeek Open Platform, register/login.
- Create an API Key, copy and save it (format:
sk-xxxxxxxx).
🔑 The API Key is the key to your account's wallet. Do not commit it to Git, send it to groups, or hardcode it into configuration files. Below, we manage it with environment variables, keeping it naturally out of files.
Step 2: Put the Key in Environment Variables
First put the Key into an environment variable (you can define the variable name yourself, here we use DEEPSEEK_API_KEY), then reference its name in the configuration file instead of writing the plaintext.
Mac / Linux:
export DEEPSEEK_API_KEY=<Your DeepSeek API Key>Windows (PowerShell):
$env:DEEPSEEK_API_KEY="<Your DeepSeek API Key>"This line of export / $env: is only valid in the current terminal window and will be gone once closed. For long-term use, write it into ~/.zshrc on Mac, ~/.bashrc on Linux and source it; on Windows, add a user variable in "System Properties -> Environment Variables".
Step 3: Create a Provider in config.toml
Edit ~/.codex/config.toml and add the following segment (each line is written according to the official configuration items):
# Top-level: Tell Codex to use our custom provider and model this time
model_provider = "deepseek"
model = "<DeepSeek's model name, subject to official documentation>"

# Define a custom model provider named deepseek
[model_providers.deepseek]
name = "DeepSeek"
base_url = "<DeepSeek's API base_url, subject to official documentation>"
env_key = "DEEPSEEK_API_KEY"   # References the environment variable from the previous step
# If wire_api is omitted, it defaults to responses (the only officially supported value)
Step-by-step explanation, so you don't copy without understanding:
model_provider = "deepseek"—— Tells Codex: "Don't use the default openai this time; use the deepseek I defined below."model = "..."—— The specific model name. DeepSeek's model name is subject to DeepSeek Official Documentation; platform upgrades will change names, so do not hardcode it.[model_providers.deepseek]—— This segment is "creating a new contact."deepseekis the ID you give it, which must match themodel_providerabove.base_url—— DeepSeek's API base URL, subject to DeepSeek official sources.env_key = "DEEPSEEK_API_KEY"—— Codex will read this environment variable to get the Key, so Step 2 must be configured first.
⚠️ I intentionally left the specific values of
modelandbase_urlas placeholders. Firstly, DeepSeek might adjust these at any time, and hardcoding them would do you a disservice; secondly—to emphasize again—whether this configuration can actually run DeepSeek gets stuck on the compatibility of theresponsesprotocol, so please rely on actual testing. The configuration syntax is correct, but "whether the other side accepts it" is not something this syntax can guarantee. Just a reminder: built-in provider IDs (openai,ollama,lmstudio) are reserved and cannot be overwritten (Source: official "Configuration Reference"), so do not name your custom IDs after these. 💡 In a nutshell: Manually modifying configuration = setting an environment variable to store the Key + creating amodel_providersprovider inconfig.toml+ pointing the top-levelmodel_providerandmodelthere; the syntax is fixed, but whether it runs depends on crossing the protocol barrier.
05 Validation: Did It Actually Connect?
Don't rush to work after configuring—validate first. Otherwise, you might spend a long time writing only to find that the requests never switched over, wasting your effort.
Validation is a two-step process, from coarse to fine:
Quick Check: Which Model is Currently in Use?
Start Codex and use the slash command /model in the session—it can switch the model used by the current thread (Source: official "Models" documentation). First, confirm that Codex recognizes the model you configured, rather than staying on the default GPT.
codexOnce inside, type:
/modelYou can also directly specify the model with the
-mparameter to start, such ascodex -m <model_name>(Source: official "Models" documentation).
The Real Test: Send a Minimal Request
Just checking if the configuration is recognized is not enough; the real test is sending a message to see if it responds normally. Give it a minimal, harmless task:
Hello, please reply in one sentence to confirm that you are working normally.Three outcomes, find yours:
| Symptom | Most Likely Cause | What to Do |
|---|---|---|
| Responded normally | It connected successfully | Congratulations, it works! |
| Error 401 / Authentication failed | API Key not set correctly, or environment variable did not take effect | Check the env_key name, reset the environment variable, and restart the terminal |
| Error 400 / Format / Protocol error | Very likely protocol incompatibility (the Responses API barrier) | This path might not work on this platform; consider switching to Route 2 or using a supported model |
| Prompt indicates model does not exist | Model name written incorrectly / platform changed the name | Check the latest model name in the official DeepSeek documentation |
Focus on that Error 400 / Protocol error—if you encounter it, don't start by doubting your configuration. This is exactly what was highlighted in Section 03: Codex requires the responses protocol, which third-party platforms might not implement. I wasted two hours on this, only to confirm it wasn't a config issue, but a mismatched protocol.
When this happens, the rational move is: either switch to Route 2 (let the proxy tool digest the protocol) or simply accept that this platform + Codex is currently incompatible, and do not beat a dead horse in the same direction—this is also a key judgment to save time.
💡 In a nutshell: Run
/modelfirst to see if the model is recognized, then send a message to test if it can respond. 401 is mostly a Key issue, and 400 is mostly protocol incompatibility—if you hit a protocol wall, switch routes or switch models, and don't try to force it.
06 After Connecting: Adjust Thinking Depth, Don't Go All In
Assuming you are lucky enough to connect, here is a practical tip: Codex allows you to adjust the model's "thinking depth"; whether you want to save tokens or prioritize quality is up to you.
The official documentation provides a configuration item model_reasoning_effort. Supported levels are minimal / low / medium / high / xhigh (where xhigh depends on the specific model; all of the above come from the official "Configuration Reference"). It is written in config.toml:
model_reasoning_effort = "medium"Analogy: Exam answering strategies. low is like speed-running multiple-choice questions—answering with a quick glance, fast but rough; high / xhigh are like solving the final complex problems—letting it think through a few steps for thorough reasoning, slow but stable. Keep it maxed out all the time? It answers well, but it's slow and expensive (tokens burn quickly).
My approach: daily use of medium is enough, which is fast and cost-effective; only when encountering a tough task that requires reading a bunch of files and cross-module reasoning do I temporarily raise it to high. Maxing it out across the board is a waste—especially since you connected to a third party to save money; if you keep effort fully open, you burn the saved money right back, defeating the purpose.
A related point to note: after connecting to a third party, some of Codex's deeply-bound official capabilities may behave differently or not work at all—for example, some built-in Web search relies on OpenAI indexing (the cache mode for web_search in the official "Configuration Reference" explicitly states it is based on indexes maintained by OpenAI). This echoes Section 02's statement about "experimental, no one to bail you out": you probably won't need it for daily coding, but keep this in mind.
💡 In a nutshell: Adjust thinking depth via
model_reasoning_effortafter connecting—dailymedium, temporarily raise tohighfor tough tasks, don't go all in and burn back the money you saved; also remember that some official-exclusive features will degrade after connecting to a third party.
07 Summary
This article did only one thing, repeatedly warning you: connecting Codex to domestic models like DeepSeek can save money, but it is an experimental approach and is more unstable than the Claude Code route.
Let's summarize the key points:
| Stage | Key Concept / Action |
|---|---|
| Understand Differences | Codex recognizes the OpenAI protocol (strongly pushes Responses API); it's not the Claude Code setup, don't copy blindly |
| Decide if it's Worth It | Subscription holders double paying, those doing tough tasks, and those who hate config tweaks should stay away |
| Choose Route | Want to understand principles -> manually modify config.toml; Just want to make it work -> proxy tools (e.g., CC Switch) |
| Configure Provider | model_providers + top-level model_provider / model, Key uses env_key |
| Validation | Check if model is recognized via /model, then send a message to test; 400 is mostly hitting the protocol wall |
| After Connecting | Adjust depth with model_reasoning_effort, don't go all in |
By now, you should be able to determine whether you should connect Codex to a third party, understand the trade-offs between the two integration routes, build the model_providers configuration skeleton according to the official syntax, and handle protocol errors calmly, knowing where to troubleshoot.
Let me leave you with the single most important sentence to remember: When connecting Codex to a third party, the biggest variable is not whether you know how to configure it, but whether the other side supports the protocol recognized by Codex. Keeping this in mind can save you hours.
Next Chapter: 06 · Running the First Task—The configuration chapters end here, and starting from the next chapter, we officially get to work. Whether you are using the official GPT or a third-party connection, use Codex to actually modify code once and run a complete task, to experience how it differs from tools you used before. Let me leave you with a question: what is the first thing you plan to have it do? Fix a bug, write a small feature, or have it "read" your project first?
04 · Subscription and Billing06 · Running the First Task